Organizing Outlook windows on Windows 7
I usually open two or more Outlook windows/messages to do my work more efficiently. In Windows XP and Vista I could select multiple Outlook windows with the CTRL button on my keyboard and then use the right click menu to organize the windows. Or, in case it was grouped automatically, simply right click on the group.
How can I do this in Windows 7? The only right click option I get regarding this is “Close all windows”.
There are several ways to achieve the same or similar results in Windows 7. The instructions below will apply to any application windows in Windows 7 and not just to Outlook.
Classic menu
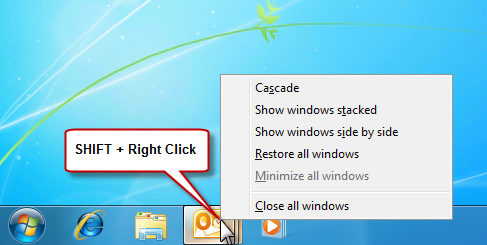
If you want to organize your entire group of Outlook windows at once, hold the SHIFT button while right clicking on the Outlook group. This will bring back the “classic” right click menu you got in Windows XP and Windows Vista with the options to cascade windows, to show windows stacked (tile horizontally) or to show windows side by side (tile vertically).
This similar trick can be used to start Outlook as an Administrator.
New auto resize feature
To quickly view only 2 of your Outlook windows side by side, click and hold down your mouse on the title bar of the first window and drag it to the left side of your screen; it will automatically resize to the entire height and the width of the left half size of your screen. Then do the same with the second window. You can restore these window sizes by dragging them back to the middle of your screen.
You can also do this by selecting the first window and then press the Windows logo key and the left arrow key on your keyboard at the same time. For the second window, you do the same but then press the right arrow key on your keyboard.
This last method is probably more effective in a multi-monitor layout since dragging it to a side where another monitor extends the view, will not auto resize the window but will simply move it to the next monitor. By using the arrow keys, you won’t have this issue. By holding the Windows logo key and then repeatedly tapping the right or left arrow key, your window will “walk” across the screens, where it will be docking at the sides and being shown in the Normal mode in the middle of the screen.
In addition to the left and right keys, you can also use the up key to maximize a selected window and the down key to minimize a selected window.
Resize only selected screens
If you only want to resize selected screens, then you’ll first have to minimize all the other screens. To do this easily, press the Windows logo key on your keyboard and the D key (which stands for Desktop) at once or click on the square in the right bottom corner.
Now select/open the screens that you want to organize so that they will become visible again. These windows can even be from different applications. After this, right click on an empty location on the Taskbar and you’ll get a menu with the options to cascade windows, to show windows stacked (tile horizontally) or to show windows side by side (tile vertically). There is no need to hold the SHIFT button for this.

The "classic" windows organize menu.

